How User-Defined Objects Work
While the plethora of pre-built objects offer an extensive set of tools for enhancing videos, you may want to add your own objects. These might be things as simple as re-usable logos, intros or outros that you'll use in a planned series - customized objects of essentially any type you can creatively use in construction of a video and/or creatively re-used.
Creating the source for user-defined objects is completely up to you. You may want to use a different illustration or design program to create objects. You may want to build reusable video components using Video Detailer. The key difference between user-defined objects and importing objects is that this is convenient, permanent storage. You will not have to go searching around for objects to import because your customizable library is just a click away.

Placing and controlling User-defined object is virtually exactly the same as working with other library items and timeline objects.
Position the timeline indicator where you want the new User-Defined object to appear.
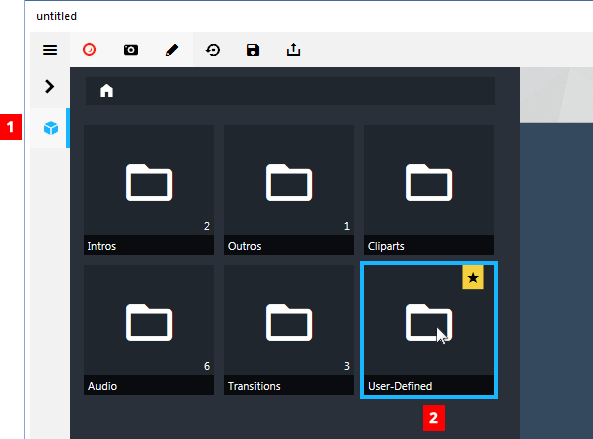
Click the Library icon [ ] on the menu bar to the left of the movie preview panel (see #1 in Figure 1). This will open the Library menu.
Double-click the User-Defined folder (see #2 in Figure 1).
This will reveal a menu of the User-Defined folder contents (see Figure 2).
NOTE: The menu will be empty until you add objects yourself. These objects were added for demonstration only.
Figure 1: Accessing the User-Defined library. Table1: Descriptions for User-Defined library control panel options.
# Name Description 1 User-Defined Items Items you have stored will appear in the menu. These items can be stored in folders you define (left [My Graphics] and [My Video Clips]) or available immediately without categorization (object at right shows a preview of the object). 2 Show in Explorer This button opens the folder where User-Defined objects are stored in a Windows Explorer window. This allows quick access to managing your personal resources.Locate the user-defined object you want to insert and double-click it.It will be inserted at the point where you placed the timeline indicator in Step 1.